Chaining queries and mutations
Using the Pipeline service you can run several queries and mutations sequentially through a single request.
Tutorial steps
To craft a pipeline, you'll need to:
- Activate Pipeline service
- Add a new field
categoryIDtoProducttype - Create a skeleton of Pipeline file
- Define
resolver - Apply changes
- Confirm the creation of the pipeline
1. Activate Pipeline service
Before we get into crafting pipelines, we first need to enable the Pipeline service.
To activate the Pipeline service in the application, add the following entry in application.tf:
<span><span style="color: var(--shiki-token-function)">resource</span><span style="color: var(--shiki-color-text)"> "tailor_application" "ims" {</span></span>
<span><span style="color: var(--shiki-color-text)"> workspace_id </span><span style="color: var(--shiki-token-keyword)">=</span><span style="color: var(--shiki-color-text)"> tailor_workspace.ims.id</span></span>
<span><span style="color: var(--shiki-color-text)"> name </span><span style="color: var(--shiki-token-keyword)">=</span><span style="color: var(--shiki-color-text)"> </span><span style="color: var(--shiki-token-string-expression)">"ims"</span></span>
<span><span style="color: var(--shiki-color-text)"> </span><span style="color: var(--shiki-token-keyword)">...</span></span>
<span><span style="color: var(--shiki-color-text)"> subgraphs </span><span style="color: var(--shiki-token-keyword)">=</span><span style="color: var(--shiki-color-text)"> [</span></span>
<span><span style="color: var(--shiki-color-text)"> </span><span style="color: var(--shiki-token-keyword)">...</span></span>
<span><span style="color: var(--shiki-color-text)"> {</span></span>
<span><span style="color: var(--shiki-color-text)"> type </span><span style="color: var(--shiki-token-keyword)">=</span><span style="color: var(--shiki-color-text)"> </span><span style="color: var(--shiki-token-string-expression)">"pipeline"</span></span>
<span><span style="color: var(--shiki-color-text)"> namespace </span><span style="color: var(--shiki-token-keyword)">=</span><span style="color: var(--shiki-color-text)"> tailor_pipeline.ims.namespace</span></span>
<span><span style="color: var(--shiki-color-text)"> }</span><span style="color: var(--shiki-token-punctuation)">,</span></span>
<span><span style="color: var(--shiki-color-text)"> ]</span></span>
<span><span style="color: var(--shiki-color-text)">}</span></span>
<span></span>Then, add pipeline.tf to the root folder of the application.
<span><span style="color: var(--shiki-token-function)">resource</span><span style="color: var(--shiki-color-text)"> "tailor_pipeline" "ims" {</span></span>
<span><span style="color: var(--shiki-color-text)"> workspace_id </span><span style="color: var(--shiki-token-keyword)">=</span><span style="color: var(--shiki-color-text)"> tailor_workspace.ims.id</span></span>
<span><span style="color: var(--shiki-color-text)"> namespace </span><span style="color: var(--shiki-token-keyword)">=</span><span style="color: var(--shiki-color-text)"> </span><span style="color: var(--shiki-token-string-expression)">"ims"</span></span>
<span><span style="color: var(--shiki-color-text)">}</span></span>
<span></span>Now, the Pipeline service is enabled. For more information, please refer to the Application guide.
2. Add a new field categoryID to Product type
Create Category type by referring to Adding new data model tutorial. Next, Add categoryID to Product type
<span><span style="color: var(--shiki-token-function)">resource</span><span style="color: var(--shiki-color-text)"> "tailor_tailordb_type" "product" {</span></span>
<span><span style="color: var(--shiki-color-text)"> workspace_id </span><span style="color: var(--shiki-token-keyword)">=</span><span style="color: var(--shiki-color-text)"> tailor_workspace.ims.id</span></span>
<span><span style="color: var(--shiki-color-text)"> namespace </span><span style="color: var(--shiki-token-keyword)">=</span><span style="color: var(--shiki-color-text)"> tailor_tailordb.ims.namespace</span></span>
<span><span style="color: var(--shiki-color-text)"> name </span><span style="color: var(--shiki-token-keyword)">=</span><span style="color: var(--shiki-color-text)"> </span><span style="color: var(--shiki-token-string-expression)">"Product"</span></span>
<span><span style="color: var(--shiki-color-text)"> description </span><span style="color: var(--shiki-token-keyword)">=</span><span style="color: var(--shiki-color-text)"> </span><span style="color: var(--shiki-token-string-expression)">"Product data schema"</span></span>
<span></span>
<span><span style="color: var(--shiki-color-text)"> fields </span><span style="color: var(--shiki-token-keyword)">=</span><span style="color: var(--shiki-color-text)"> {</span></span>
<span><span style="color: var(--shiki-color-text)"> title </span><span style="color: var(--shiki-token-keyword)">=</span><span style="color: var(--shiki-color-text)"> {</span></span>
<span><span style="color: var(--shiki-color-text)"> type </span><span style="color: var(--shiki-token-keyword)">=</span><span style="color: var(--shiki-color-text)"> </span><span style="color: var(--shiki-token-string-expression)">"string"</span></span>
<span><span style="color: var(--shiki-color-text)"> description </span><span style="color: var(--shiki-token-keyword)">=</span><span style="color: var(--shiki-color-text)"> </span><span style="color: var(--shiki-token-string-expression)">"Title of the product"</span></span>
<span><span style="color: var(--shiki-color-text)"> index </span><span style="color: var(--shiki-token-keyword)">=</span><span style="color: var(--shiki-color-text)"> </span><span style="color: var(--shiki-token-constant)">true</span></span>
<span><span style="color: var(--shiki-color-text)"> required </span><span style="color: var(--shiki-token-keyword)">=</span><span style="color: var(--shiki-color-text)"> </span><span style="color: var(--shiki-token-constant)">true</span></span>
<span><span style="color: var(--shiki-color-text)"> }</span></span>
<span><span style="color: var(--shiki-color-text)"> description </span><span style="color: var(--shiki-token-keyword)">=</span><span style="color: var(--shiki-color-text)"> {</span></span>
<span><span style="color: var(--shiki-color-text)"> type </span><span style="color: var(--shiki-token-keyword)">=</span><span style="color: var(--shiki-color-text)"> </span><span style="color: var(--shiki-token-string-expression)">"string"</span></span>
<span><span style="color: var(--shiki-color-text)"> description </span><span style="color: var(--shiki-token-keyword)">=</span><span style="color: var(--shiki-color-text)"> </span><span style="color: var(--shiki-token-string-expression)">"Description of the product"</span></span>
<span><span style="color: var(--shiki-color-text)"> }</span></span>
<span><span style="color: var(--shiki-color-text)"> categoryID </span><span style="color: var(--shiki-token-keyword)">=</span><span style="color: var(--shiki-color-text)"> {</span></span>
<span><span style="color: var(--shiki-color-text)"> type </span><span style="color: var(--shiki-token-keyword)">=</span><span style="color: var(--shiki-color-text)"> </span><span style="color: var(--shiki-token-string-expression)">"uuid"</span></span>
<span><span style="color: var(--shiki-color-text)"> description </span><span style="color: var(--shiki-token-keyword)">=</span><span style="color: var(--shiki-color-text)"> </span><span style="color: var(--shiki-token-string-expression)">"Category ID of the product"</span></span>
<span><span style="color: var(--shiki-color-text)"> }</span></span>
<span><span style="color: var(--shiki-color-text)"> </span><span style="color: var(--shiki-token-keyword)">...</span></span>
<span><span style="color: var(--shiki-color-text)"> }</span></span>
<span></span>
<span><span style="color: var(--shiki-color-text)"> type_permission </span><span style="color: var(--shiki-token-keyword)">=</span><span style="color: var(--shiki-color-text)"> local.permission_everyone</span></span>
<span><span style="color: var(--shiki-color-text)">}</span></span>
<span></span>3. Create a skeleton of Pipeline file
In the pipeline.tf file, let's define types that are accessible to all resolvers in this pipeline.
<span><span style="color: var(--shiki-token-function)">resource</span><span style="color: var(--shiki-color-text)"> "tailor_pipeline" "ims" {</span></span>
<span><span style="color: var(--shiki-color-text)"> workspace_id </span><span style="color: var(--shiki-token-keyword)">=</span><span style="color: var(--shiki-color-text)"> tailor_workspace.ims.id</span></span>
<span><span style="color: var(--shiki-color-text)"> namespace </span><span style="color: var(--shiki-token-keyword)">=</span><span style="color: var(--shiki-color-text)"> </span><span style="color: var(--shiki-token-string-expression)">"ims"</span></span>
<span></span>
<span><span style="color: var(--shiki-color-text)"> common_sdl </span><span style="color: var(--shiki-token-keyword)">=</span><span style="color: var(--shiki-color-text)"> </span><span style="color: var(--shiki-token-keyword)"><<EOF</span></span>
<span><span style="color: var(--shiki-token-string)"> # here we define common types used in the pipeline</span></span>
<span><span style="color: var(--shiki-token-string)"> type Query {</span></span>
<span><span style="color: var(--shiki-token-string)"> dummy: Boolean</span></span>
<span><span style="color: var(--shiki-token-string)"> }</span></span>
<span></span>
<span><span style="color: var(--shiki-token-string)"> type Mutation {</span></span>
<span><span style="color: var(--shiki-token-string)"> dummy: Boolean</span></span>
<span><span style="color: var(--shiki-token-string)"> }</span></span>
<span><span style="color: var(--shiki-token-keyword)"> EOF</span></span>
<span><span style="color: var(--shiki-color-text)">}</span></span>
<span></span>4. Define createCategoryForProduct resolver
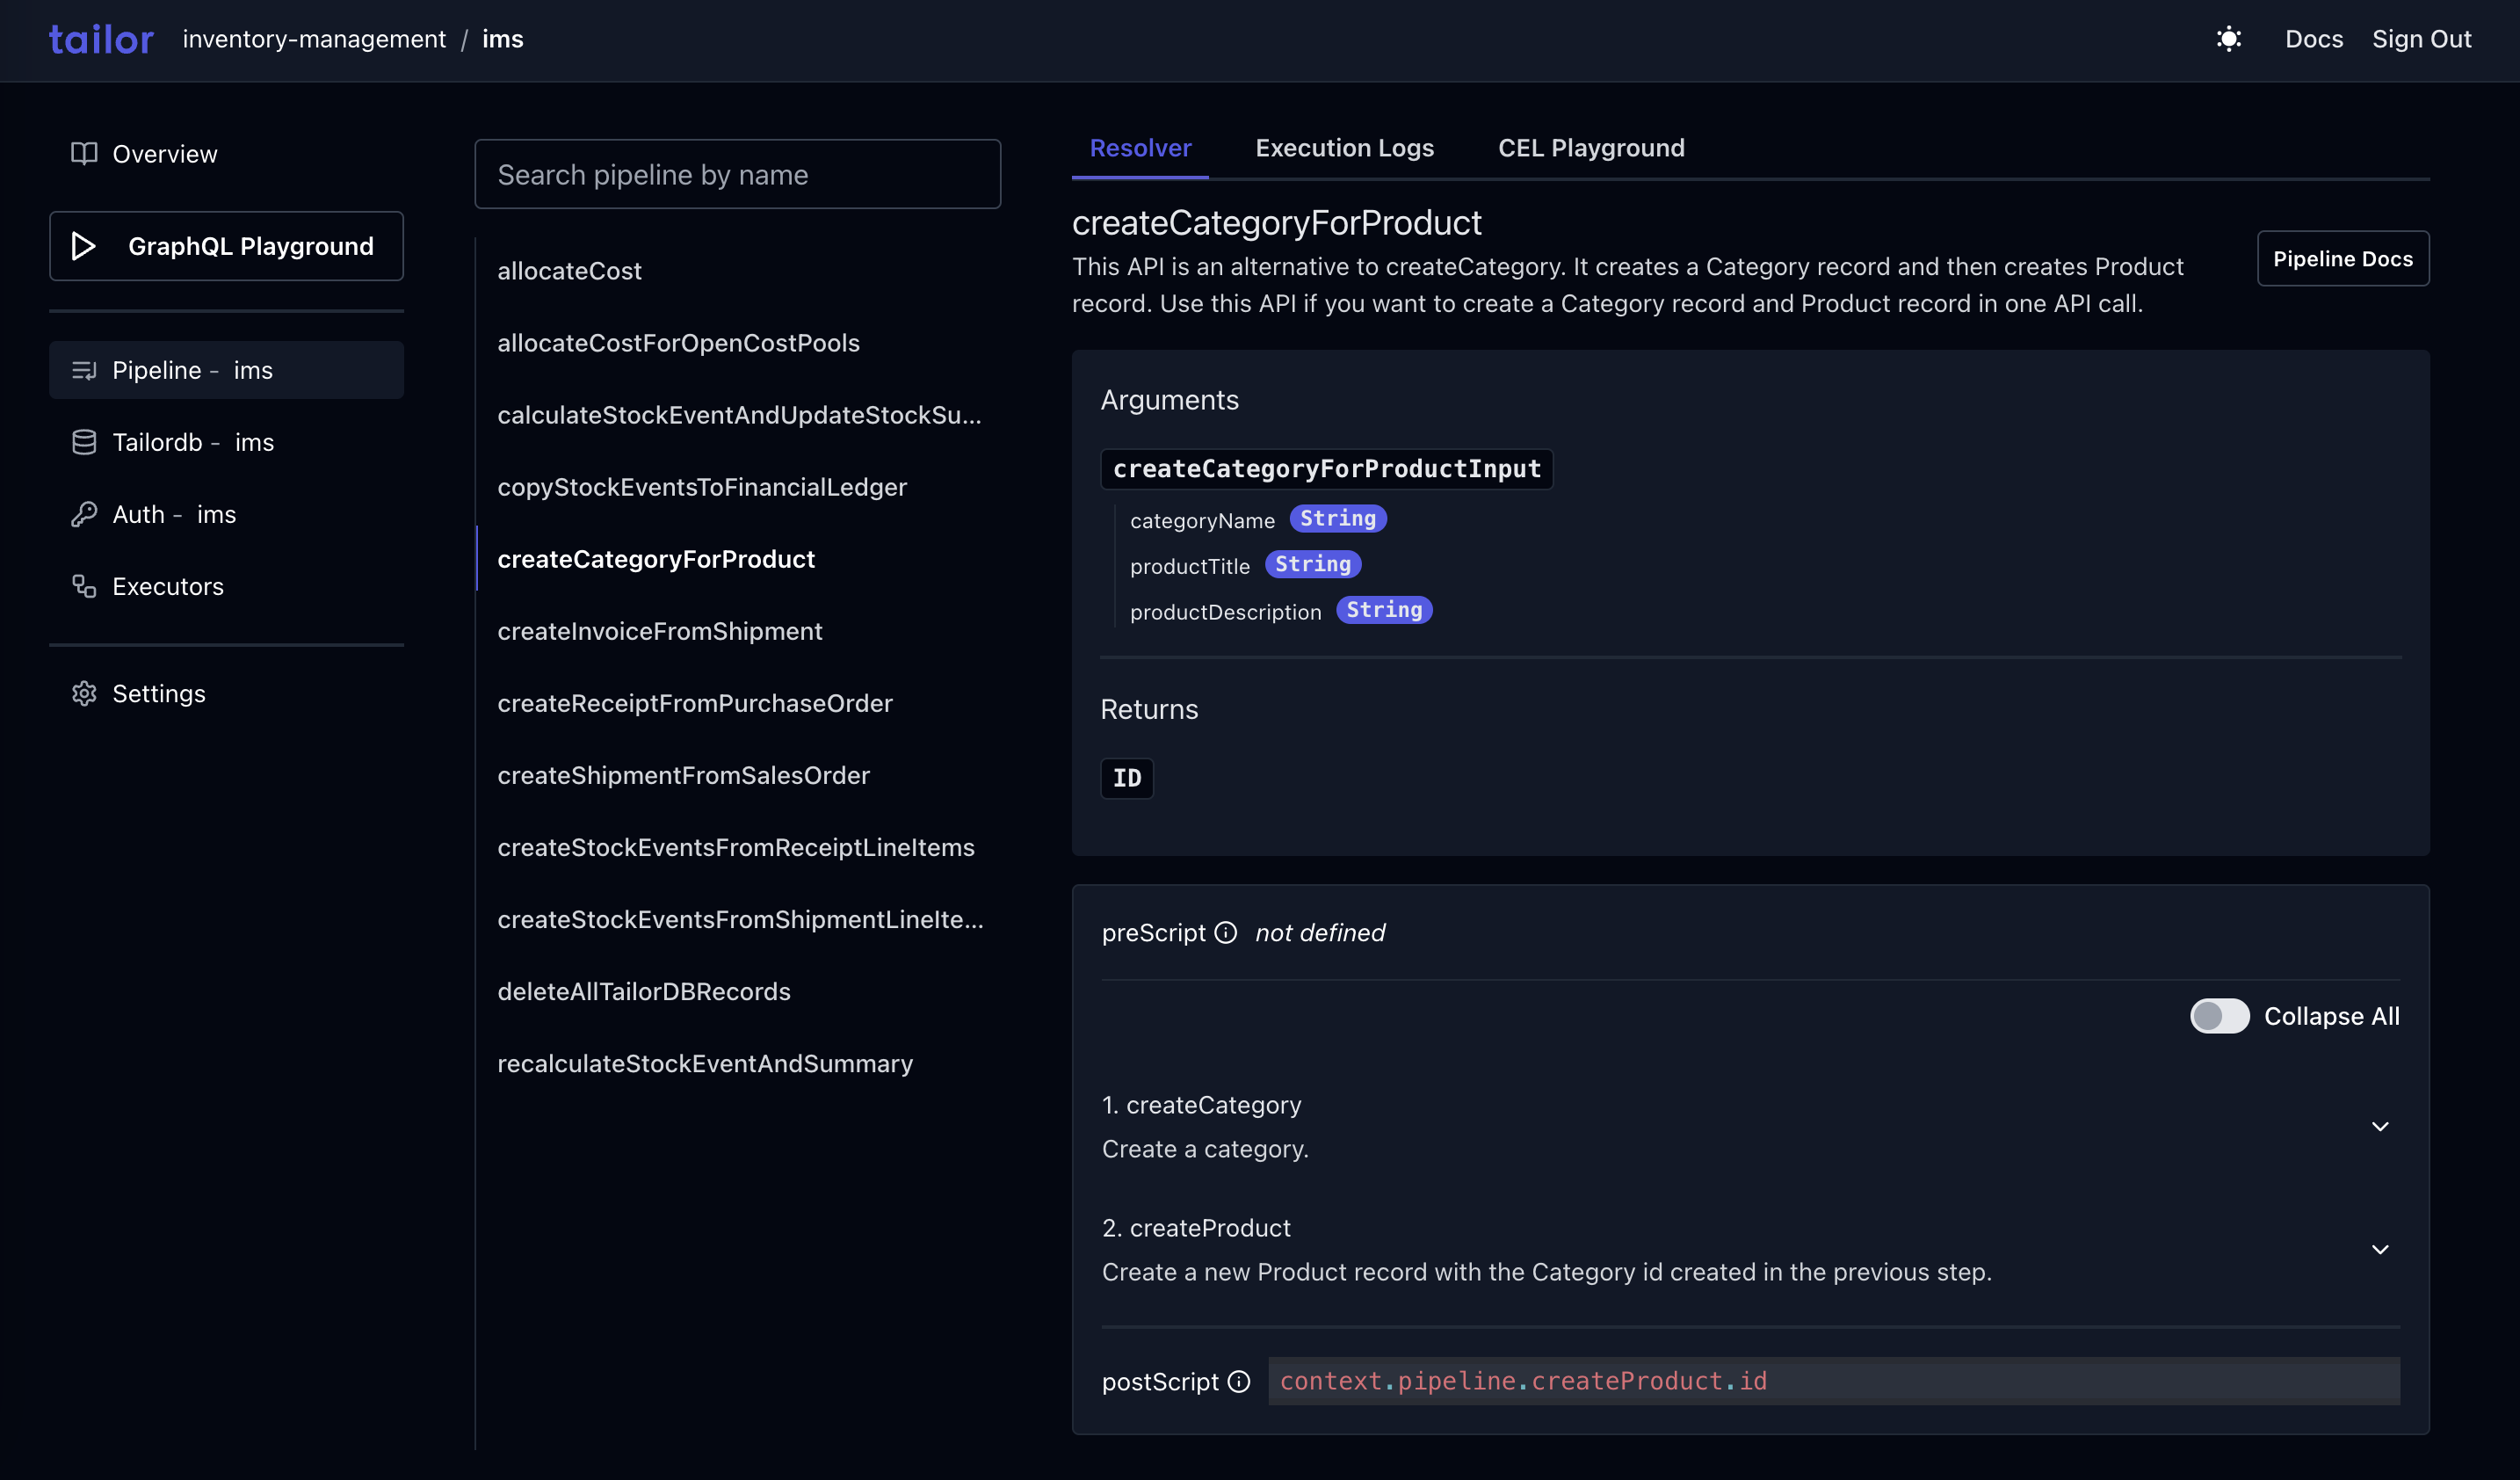
The pipeline we're going to craft will provide a mutation that creates a new Category and Product record using the input.
To create a pipeline resolver, add a pipeline_<resolver_name>.tf file to the root folder of the application.
<span><span style="color: var(--shiki-token-function)">resource</span><span style="color: var(--shiki-color-text)"> "tailor_pipeline_resolver" "pipeline_create_category_for_product" {</span></span>
<span><span style="color: var(--shiki-color-text)"> workspace_id </span><span style="color: var(--shiki-token-keyword)">=</span><span style="color: var(--shiki-color-text)"> tailor_workspace.ims.id</span></span>
<span><span style="color: var(--shiki-color-text)"> namespace </span><span style="color: var(--shiki-token-keyword)">=</span><span style="color: var(--shiki-color-text)"> tailor_pipeline.ims.namespace</span></span>
<span><span style="color: var(--shiki-color-text)"> name </span><span style="color: var(--shiki-token-keyword)">=</span><span style="color: var(--shiki-color-text)"> </span><span style="color: var(--shiki-token-string-expression)">"createCategoryForProduct"</span></span>
<span><span style="color: var(--shiki-color-text)"> description </span><span style="color: var(--shiki-token-keyword)">=</span><span style="color: var(--shiki-color-text)"> </span><span style="color: var(--shiki-token-string-expression)">"This API is an alternative to createCategory. It creates a Category record and then creates Product record. Use this API if you want to create a Category record and Product record in one API call."</span></span>
<span><span style="color: var(--shiki-color-text)"> authorization </span><span style="color: var(--shiki-token-keyword)">=</span><span style="color: var(--shiki-color-text)"> {</span></span>
<span><span style="color: var(--shiki-color-text)"> insecure </span><span style="color: var(--shiki-token-keyword)">=</span><span style="color: var(--shiki-color-text)"> </span><span style="color: var(--shiki-token-constant)">true</span></span>
<span><span style="color: var(--shiki-color-text)"> }</span></span>
<span></span>
<span><span style="color: var(--shiki-color-text)"> sdl </span><span style="color: var(--shiki-token-keyword)">=</span><span style="color: var(--shiki-color-text)"> </span><span style="color: var(--shiki-token-keyword)"><<EOF</span></span>
<span><span style="color: var(--shiki-token-string)"> input addCategoryAndProductInput {</span></span>
<span><span style="color: var(--shiki-token-string)"> name: String!</span></span>
<span><span style="color: var(--shiki-token-string)"> productTitle: String!</span></span>
<span><span style="color: var(--shiki-token-string)"> productDescription: String!</span></span>
<span><span style="color: var(--shiki-token-string)"> }</span></span>
<span><span style="color: var(--shiki-token-string)"> type addCategoryAndProductResponse {</span></span>
<span><span style="color: var(--shiki-token-string)"> id: ID!</span></span>
<span><span style="color: var(--shiki-token-string)"> }</span></span>
<span></span>
<span><span style="color: var(--shiki-token-string)"> extend type Mutation {</span></span>
<span><span style="color: var(--shiki-token-string)"> createCategoryForProduct(input: addCategoryAndProductInput!): addCategoryAndProductResponse!</span></span>
<span><span style="color: var(--shiki-token-string)"> }</span></span>
<span><span style="color: var(--shiki-token-keyword)"> EOF</span></span>
<span></span>
<span><span style="color: var(--shiki-color-text)"> steps </span><span style="color: var(--shiki-token-keyword)">=</span><span style="color: var(--shiki-color-text)"> [</span></span>
<span><span style="color: var(--shiki-color-text)"> {</span><span style="color: var(--shiki-token-keyword)">...</span><span style="color: var(--shiki-color-text)">}</span><span style="color: var(--shiki-token-punctuation)">,</span></span>
<span><span style="color: var(--shiki-color-text)"> ]</span></span>
<span><span style="color: var(--shiki-color-text)">}</span></span>
<span></span>Caveats
Subscriptionoperations are not supported, onlyMutationandQuerymay be used. For more details of the properties inpipeline.#Resolver, please refer to the Pipeline Reference.
Next, we're going to add the steps this specific pipeline resolver will go through.
Step 1: Create category record based on the categoryName.
In the Pipelines array, let's add the first step: creating a category.
<span><span style="color: var(--shiki-color-text)">{ </span></span>
<span><span style="color: var(--shiki-color-text)"> name </span><span style="color: var(--shiki-token-keyword)">=</span><span style="color: var(--shiki-color-text)"> </span><span style="color: var(--shiki-token-string-expression)">"createCategory"</span></span>
<span><span style="color: var(--shiki-color-text)"> pre_script </span><span style="color: var(--shiki-token-keyword)">=</span><span style="color: var(--shiki-color-text)"> </span><span style="color: var(--shiki-token-keyword)"><<EOF</span></span>
<span><span style="color: var(--shiki-token-string)"> ({</span></span>
<span><span style="color: var(--shiki-token-string)"> "categoryName": context.args.input.name,</span></span>
<span><span style="color: var(--shiki-token-string)"> })</span></span>
<span><span style="color: var(--shiki-token-keyword)"> EOF</span></span>
<span><span style="color: var(--shiki-color-text)"> operation </span><span style="color: var(--shiki-token-keyword)">=</span><span style="color: var(--shiki-color-text)"> {</span></span>
<span><span style="color: var(--shiki-color-text)"> tailor_graphql </span><span style="color: var(--shiki-token-keyword)">=</span><span style="color: var(--shiki-color-text)"> {</span></span>
<span><span style="color: var(--shiki-color-text)"> invoker </span><span style="color: var(--shiki-token-keyword)">=</span><span style="color: var(--shiki-color-text)"> {</span></span>
<span><span style="color: var(--shiki-color-text)"> event_user </span><span style="color: var(--shiki-token-keyword)">=</span><span style="color: var(--shiki-color-text)"> </span><span style="color: var(--shiki-token-constant)">true</span></span>
<span><span style="color: var(--shiki-color-text)"> }</span></span>
<span><span style="color: var(--shiki-color-text)"> query </span><span style="color: var(--shiki-token-keyword)">=</span><span style="color: var(--shiki-color-text)"> </span><span style="color: var(--shiki-token-keyword)"><<EOF</span></span>
<span><span style="color: var(--shiki-token-string)"> mutation createCategory ($categoryName: String!) {</span></span>
<span><span style="color: var(--shiki-token-string)"> createCategory (input: { name: $categoryName }) {</span></span>
<span><span style="color: var(--shiki-token-string)"> id</span></span>
<span><span style="color: var(--shiki-token-string)"> }</span></span>
<span><span style="color: var(--shiki-token-string)"> }</span></span>
<span><span style="color: var(--shiki-token-keyword)"> EOF</span></span>
<span><span style="color: var(--shiki-color-text)"> }</span></span>
<span><span style="color: var(--shiki-color-text)"> }</span></span>
<span><span style="color: var(--shiki-color-text)"> post_script </span><span style="color: var(--shiki-token-keyword)">=</span><span style="color: var(--shiki-color-text)"> </span><span style="color: var(--shiki-token-keyword)"><<EOF</span></span>
<span><span style="color: var(--shiki-token-string)"> args.createCategory</span></span>
<span><span style="color: var(--shiki-token-keyword)"> EOF</span></span>
<span><span style="color: var(--shiki-color-text)">},</span></span>
<span></span>In PreScript we can transform the arguments that are going to be passed to the GraphQL query.
context.args is an object containing the arguments passed to the pipeline resolver.
As we defined in the Inputs property, the input property is going to be an object of type createCategoryForProductInput.
The value of the Query property is the GraphQL query that is going to be executed.
In PostScript we can transform the result of the query, which is going to be assigned to args.
Here we do not need to change the shape or contents of the result so we pass the result of the createCategory query to the next step.
Specifically, the next step would receive an object called args with the following properties:
<span><span style="color: var(--shiki-color-text)">{</span></span>
<span><span style="color: var(--shiki-color-text)"> </span><span style="color: var(--shiki-token-keyword)">"id"</span><span style="color: var(--shiki-token-punctuation)">:</span><span style="color: var(--shiki-color-text)"> </span><span style="color: var(--shiki-token-string-expression)">"<- uuid of the category ->"</span></span>
<span><span style="color: var(--shiki-color-text)">}</span></span>
<span></span>There are 2 ways to access the result value of an already executed pipeline step: args and context.pipeline.{PIPELINE_NAME}.{PROPERTY_NAME}.
In most cases, we recommend using context.pipeline.{PIPELINE_NAME}.{PROPERTY_NAME} because it is accessible to all pipeline steps that occur after the execution of the {PIPELINE_NAME} step.
However, args is only accessible in the pipeline step immediately following the previous step. args holds the result of the PostScript from the previous step.
Here is an example that demonstrates the content of args after each step in the pipeline:
- step A
- step B (args contains step A post script data)
- step C (args contains step B post script data)
Step 2: Use the data in the createCategory as inputs for creating a new Product record.
In the second step, we will create a Product record for the category created in step 1.
<span><span style="color: var(--shiki-color-text)">{</span></span>
<span><span style="color: var(--shiki-color-text)"> name: </span><span style="color: var(--shiki-token-string-expression)">"createProduct"</span></span>
<span><span style="color: var(--shiki-color-text)"> description: </span><span style="color: var(--shiki-token-string-expression)">"Create a new Product record with the Category id created in the previous step."</span></span>
<span><span style="color: var(--shiki-color-text)"> pre_script </span><span style="color: var(--shiki-token-keyword)">=</span><span style="color: var(--shiki-color-text)"> </span><span style="color: var(--shiki-token-keyword)"><<EOF</span></span>
<span><span style="color: var(--shiki-token-string)"> ({</span></span>
<span><span style="color: var(--shiki-token-string)"> "categoryID": context.pipeline.createCategory.id,</span></span>
<span><span style="color: var(--shiki-token-string)"> "title": context.args.input.productTitle,</span></span>
<span><span style="color: var(--shiki-token-string)"> "description": context.args.input.productDescription, </span></span>
<span><span style="color: var(--shiki-token-string)"> })</span></span>
<span><span style="color: var(--shiki-token-keyword)"> EOF</span></span>
<span><span style="color: var(--shiki-color-text)"> operation </span><span style="color: var(--shiki-token-keyword)">=</span><span style="color: var(--shiki-color-text)"> {</span></span>
<span><span style="color: var(--shiki-color-text)"> tailor_graphql </span><span style="color: var(--shiki-token-keyword)">=</span><span style="color: var(--shiki-color-text)"> {</span></span>
<span><span style="color: var(--shiki-color-text)"> invoker </span><span style="color: var(--shiki-token-keyword)">=</span><span style="color: var(--shiki-color-text)"> {</span></span>
<span><span style="color: var(--shiki-color-text)"> event_user </span><span style="color: var(--shiki-token-keyword)">=</span><span style="color: var(--shiki-color-text)"> </span><span style="color: var(--shiki-token-constant)">true</span></span>
<span><span style="color: var(--shiki-color-text)"> }</span></span>
<span><span style="color: var(--shiki-color-text)"> query </span><span style="color: var(--shiki-token-keyword)">=</span><span style="color: var(--shiki-color-text)"> </span><span style="color: var(--shiki-token-keyword)"><<EOF</span></span>
<span><span style="color: var(--shiki-token-string)"> mutation createProduct ($categoryID: ID!, $title: String!, $description: String!) {</span></span>
<span><span style="color: var(--shiki-token-string)"> createProduct (input: {categoryID: $categoryID, title: $title, description: $description}) {</span></span>
<span><span style="color: var(--shiki-token-string)"> id</span></span>
<span><span style="color: var(--shiki-token-string)"> } </span></span>
<span><span style="color: var(--shiki-token-string)"> }</span></span>
<span><span style="color: var(--shiki-token-keyword)"> EOF</span></span>
<span><span style="color: var(--shiki-color-text)"> }</span></span>
<span><span style="color: var(--shiki-color-text)"> }</span></span>
<span><span style="color: var(--shiki-color-text)"> post_script: </span><span style="color: var(--shiki-token-string-expression)">"args.createProduct"</span></span>
<span><span style="color: var(--shiki-color-text)">},</span></span>
<span></span>We dynamically crafted the input of the GraphQL query in PreScript, setting the categoryID property with the created category.
Finally, in PostScript we return the result of the createProduct mutation.
5. Apply changes
Now that our pipeline is ready, we can deploy it using:
<span><span style="color: var(--shiki-token-function)">terraform</span><span style="color: var(--shiki-color-text)"> </span><span style="color: var(--shiki-token-string)">apply</span></span>
<span></span>
6. Confirm the creation of the pipeline
You can view the created pipeline in the Console.

In the console, select GraphQL Playground to call the pipeline using a mutation such as:
<span><span style="color: var(--shiki-token-keyword)">mutation</span><span style="color: var(--shiki-color-text)"> {</span></span>
<span><span style="color: var(--shiki-color-text)"> createCategoryForProduct(input: </span></span>
<span><span style="color: var(--shiki-color-text)"> {</span></span>
<span><span style="color: var(--shiki-color-text)"> </span><span style="color: var(--shiki-token-string)">categoryName</span><span style="color: var(--shiki-color-text)">: </span><span style="color: var(--shiki-token-string-expression)">"Jackets"</span></span>
<span><span style="color: var(--shiki-color-text)"> </span><span style="color: var(--shiki-token-string)">productTitle</span><span style="color: var(--shiki-color-text)">: </span><span style="color: var(--shiki-token-string-expression)">"Recycled Polyester Jacket"</span></span>
<span><span style="color: var(--shiki-color-text)"> </span><span style="color: var(--shiki-token-string)">productDescription</span><span style="color: var(--shiki-color-text)">: </span><span style="color: var(--shiki-token-string-expression)">"Warm, lightweight jacket made from recycled polyester"</span></span>
<span><span style="color: var(--shiki-color-text)"> })</span></span>
<span><span style="color: var(--shiki-color-text)">}</span></span>
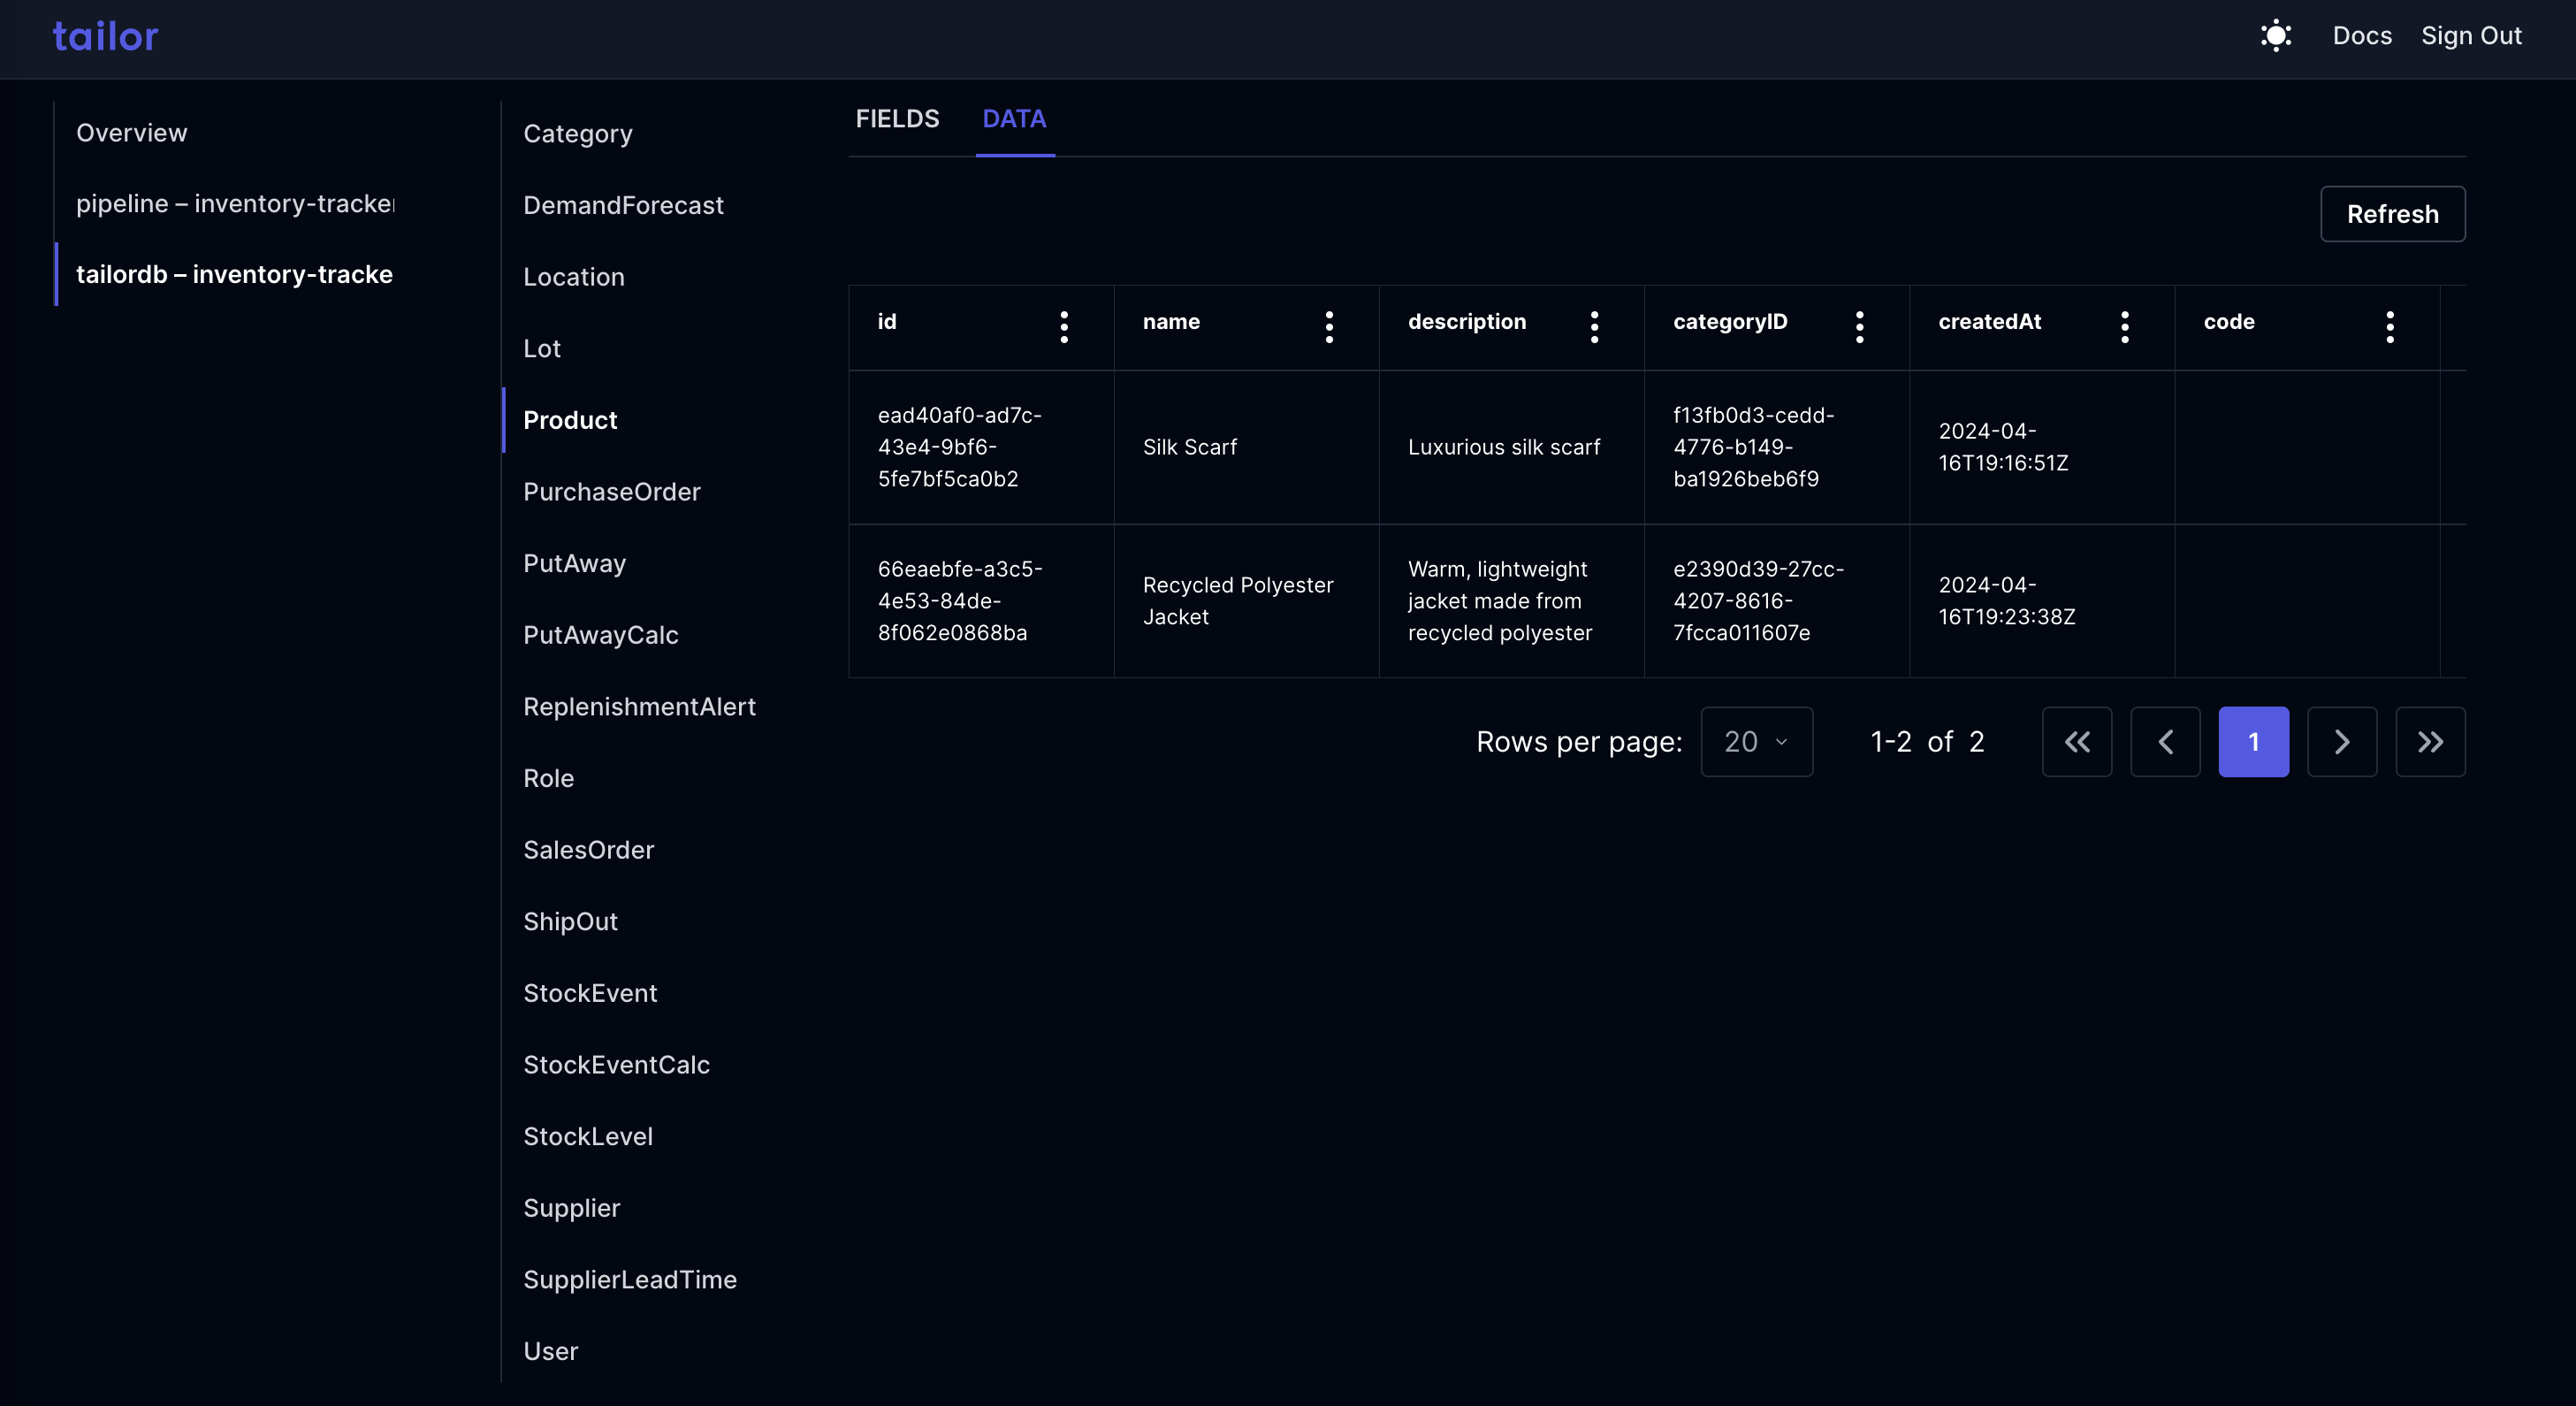
<span></span>After calling the pipeline, you can view the created Product record in the console.

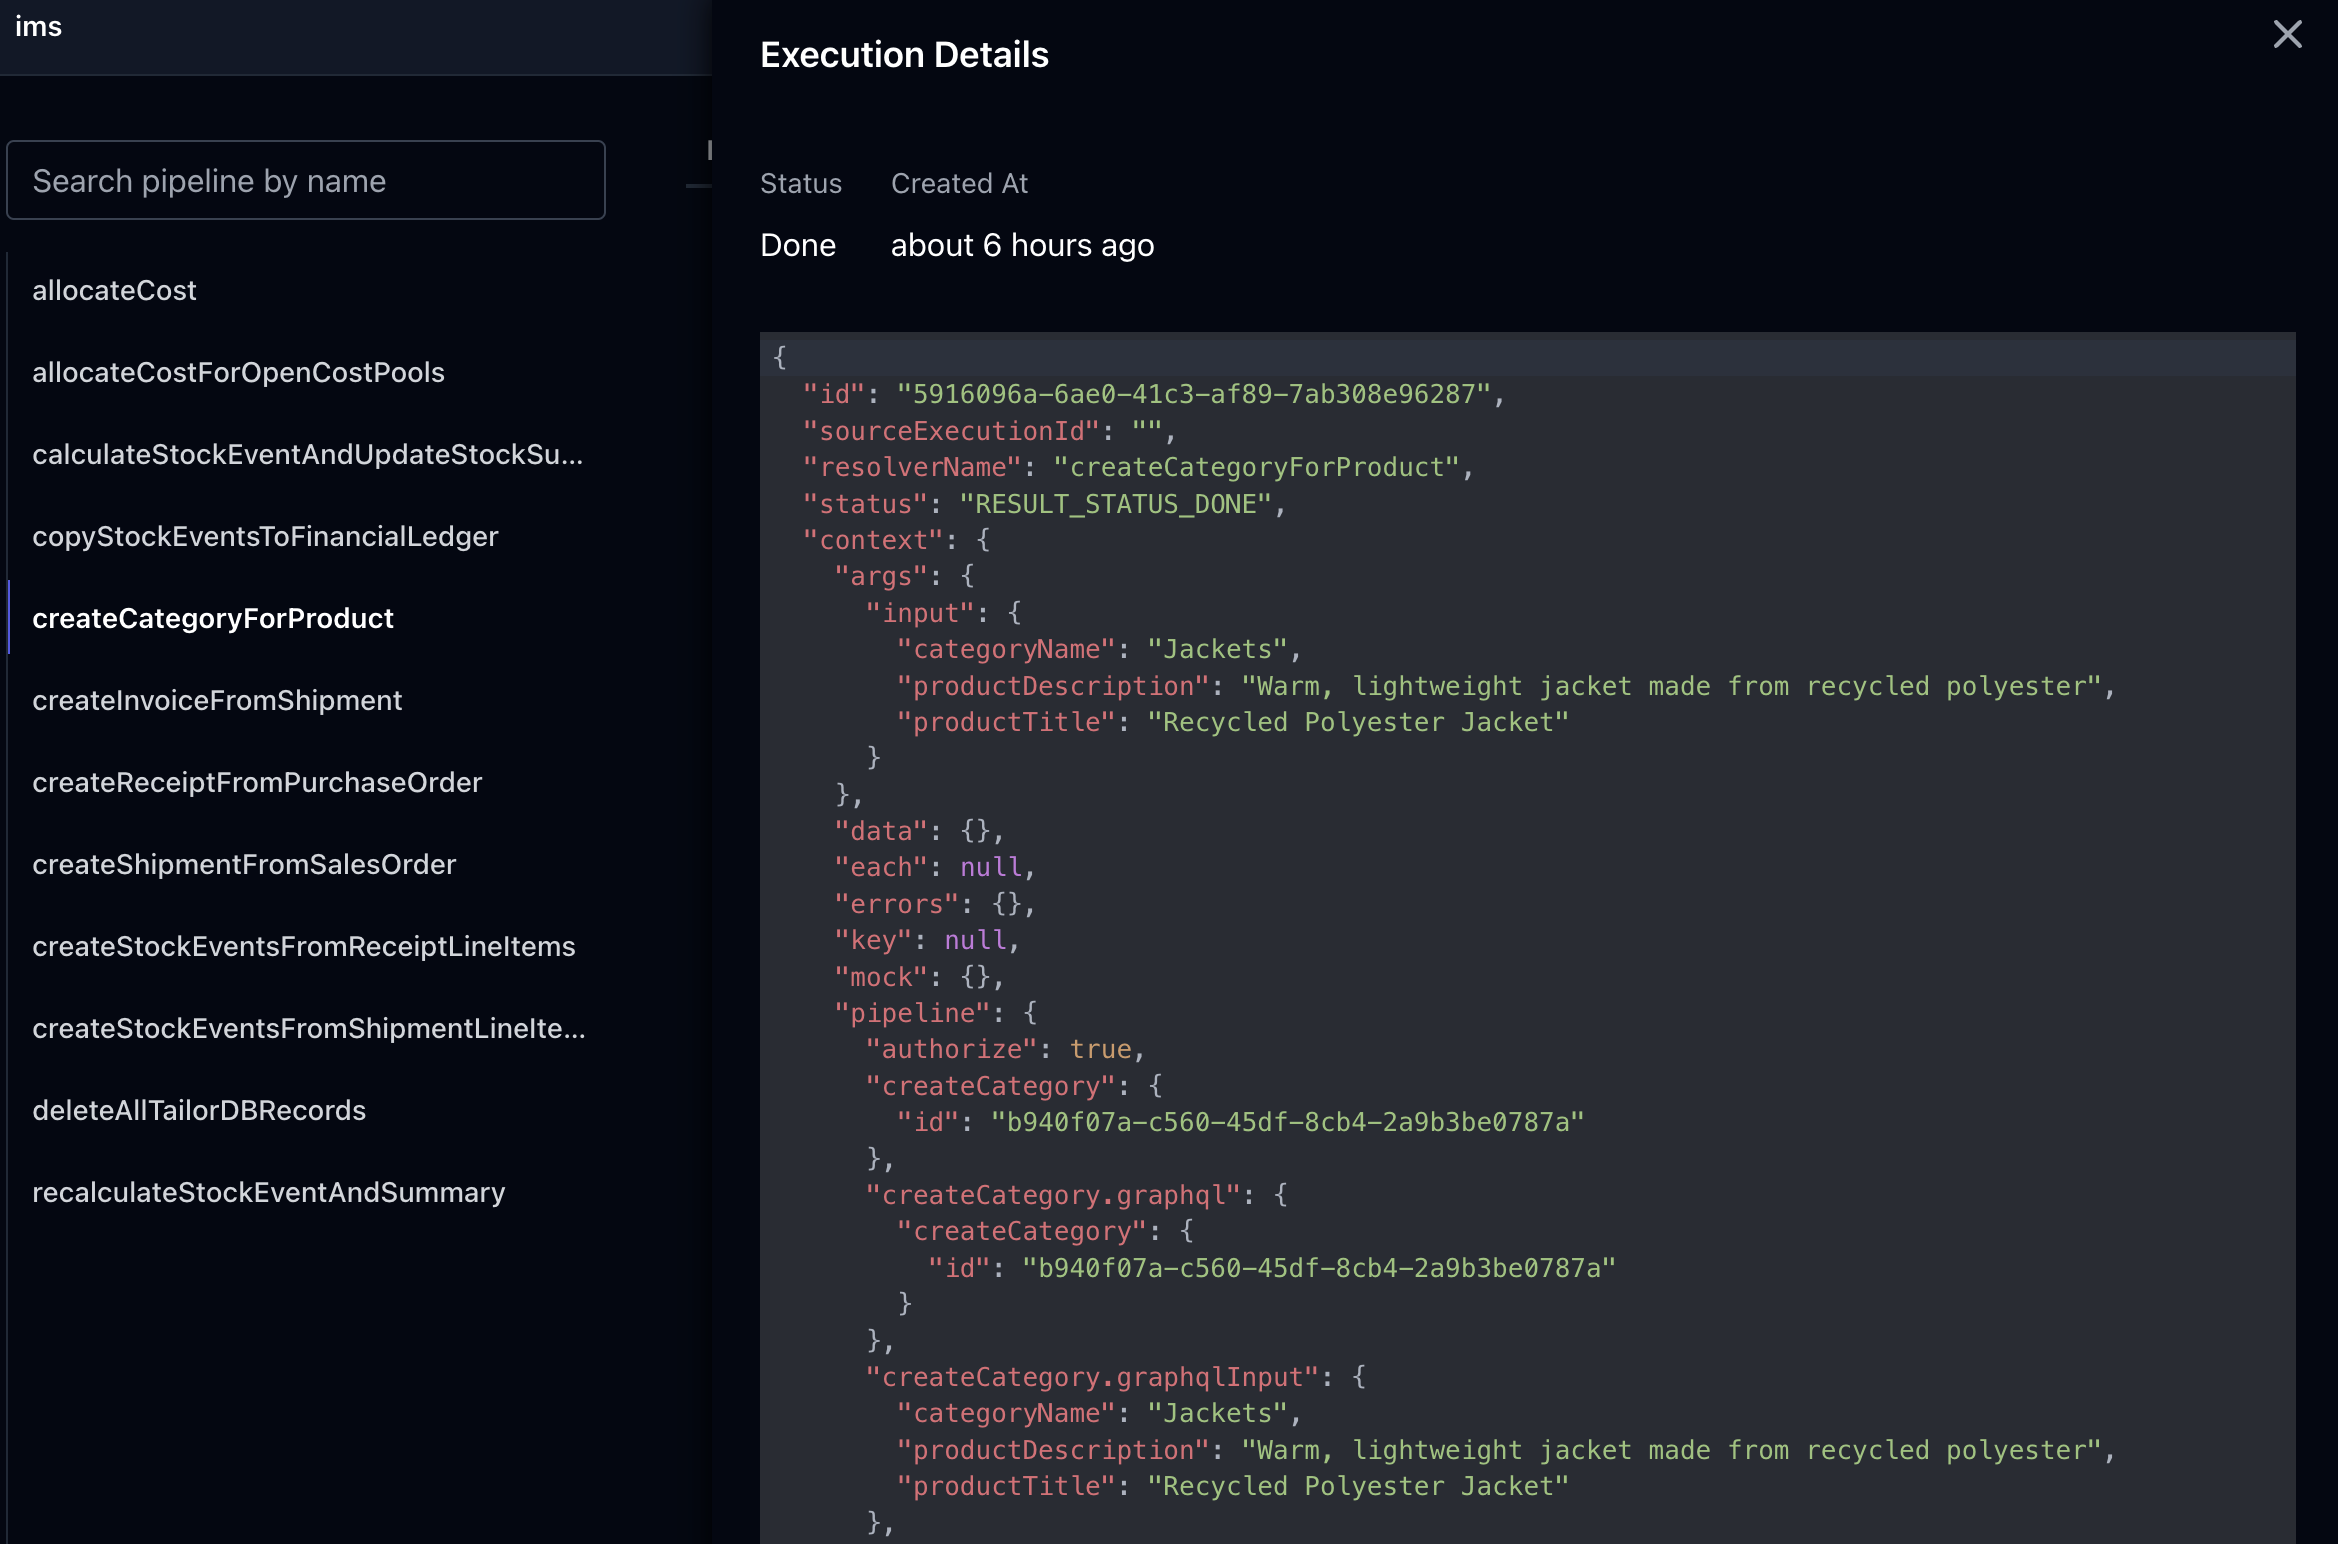
You can now view the resolver's execution logs in the console. Select the Execution Logs tab to see the list of logs.

Click on View Details to see the input data for each pipeline step.

Further Information
In this tutorial we only scratched the surface of what's possible to do using the Pipeline service. For a complete reference, please see the Pipeline Reference.