Using OAuth2 to log in to the Tailor PF app
In this tutorial, you'll learn how to set up secure user access to your Tailor PF app using OAuth2 authentication with the Tailor Platform SDK.
Prerequisites
- Complete the SDK Quickstart
- Set up the IdP
- Register your IdP
Tutorial Steps
- Configure OAuth2 client in the Auth configuration
- Deploy and log in to the app
- Connect with Next.js UI (optional)
1. Configure OAuth2 Client in the Auth Configuration
Update your tailor.config.ts to include OAuth2 client configuration:
import { defineConfig } from "@tailor-platform/sdk";

export default defineConfig({
  name: "project-management",
  db: {
    "main-db": {
      files: ["db/**/*.ts"],
    },
  },
  auth: {
    namespace: "project-management-auth",
    idpConfigs: [
      {
        name: "oidc-provider",
        oidc: {
          clientId: process.env.OIDC_CLIENT_ID!,
          clientSecret: {
            vaultName: "my-vault",
            secretName: "oidc-client-secret",
          },
          providerUrl: process.env.OIDC_PROVIDER_URL!,
        },
      },
    ],
    userProfileConfig: {
      tailordb: {
        namespace: "main-db",
        type: "User",
        usernameField: "email",
        attributeFields: ["roles"],
      },
    },
    oauth2Clients: [
      {
        name: "spa-client",
        description: "OAuth2 browser client for SPA",
        clientType: "browser",
        redirectUris: [
          "http://localhost:3000/__oauth/callback",
          "http://tailorctl.tailor.tech:8086/callback",
        ],
        grantTypes: ["authorization_code", "refresh_token"],
      },
    ],
  },
});
OAuth2 Client Properties:
| Property | Description |
|---|---|
name | The name of the OAuth2 client. Use descriptive names like "spa-client" or "server-client". |
clientType | Specifies the OAuth2 client type: - "confidential" for server-side applications that can securely store credentials - "public" for mobile applications that cannot securely store secrets - "browser" for Single Page Applications (SPAs) with enhanced security features. For guidance on choosing the right client type for SPA applications, see OAuth2 Client Selection for SPAs. |
grantTypes | An array specifying supported OAuth2 grant types: - authorization_code: for standard OAuth2 flows - refresh_token: to refresh access tokens. |
redirectUris | A list of redirect URIs where the authorization server will send users after authentication. Includes: - http://localhost:3000/__oauth/callback: the default route in the Next.js app handling OAuth2 callbacks - http://tailorctl.tailor.tech:8086/callback: enables login via tailorctl. |
Multiple OAuth2 Clients:
You can configure multiple OAuth2 clients for different use cases:
oauth2Clients: [
  {
    name: "spa-client",
    description: "OAuth2 browser client for SPA",
    clientType: "browser",
    redirectUris: ["http://localhost:3000/__oauth/callback"],
    grantTypes: ["authorization_code", "refresh_token"],
  },
  {
    name: "server-client",
    description: "OAuth2 confidential client for server-side",
    clientType: "confidential",
    redirectUris: ["https://api.example.com/callback"],
    grantTypes: ["authorization_code", "refresh_token", "client_credentials"],
  },
  {
    name: "mobile-client",
    description: "OAuth2 public client for mobile apps",
    clientType: "public",
    redirectUris: ["myapp://callback"],
    grantTypes: ["authorization_code", "refresh_token"],
  },
],
2. Deploy and Log In to Your Tailor PF App
Deploy the Configuration
Deploy your application with the OAuth2 client configuration:
npm run deploy -- --workspace-id <your-workspace-id>Log In Using SDK CLI
Run the following command to access your application:
tailor-sdk login --oauth2-client spa-clientYou will be redirected to your IdP (e.g., Auth0) to authenticate. Log in with your credentials.
After successfully logging in, you will receive the access token.
Use the Token in GraphQL Playground
To include the token in GraphQL Playground, navigate to the Headers tab and add the token to the Authorization header:
{
  "Authorization": "Bearer {ACCESS_TOKEN}"
}
3. Connecting Tailor PF App and Next.js UI (Optional)
In this section, you'll learn how to integrate OAuth 2.0 authentication into a sample Next.js application to enable secure login to the Tailor PF app.
1. Get Client credentials
Run the following command to get the client_id and client_secret.
tailor-sdk oauth2client listYou will get the following response with the client credentials which is used in the Next.js app for OAuth2 client configuration.
+---------------+---------------------------------------------+
| NAME | spa-client |
| DESCRIPTION | OAuth2 browser client for SPA |
| GRANT_TYPES | authorization_code,refresh_token |
| REDIRECT_URIS | http://localhost:3000/__oauth/callback |
| CLIENT_ID | <client_id> |
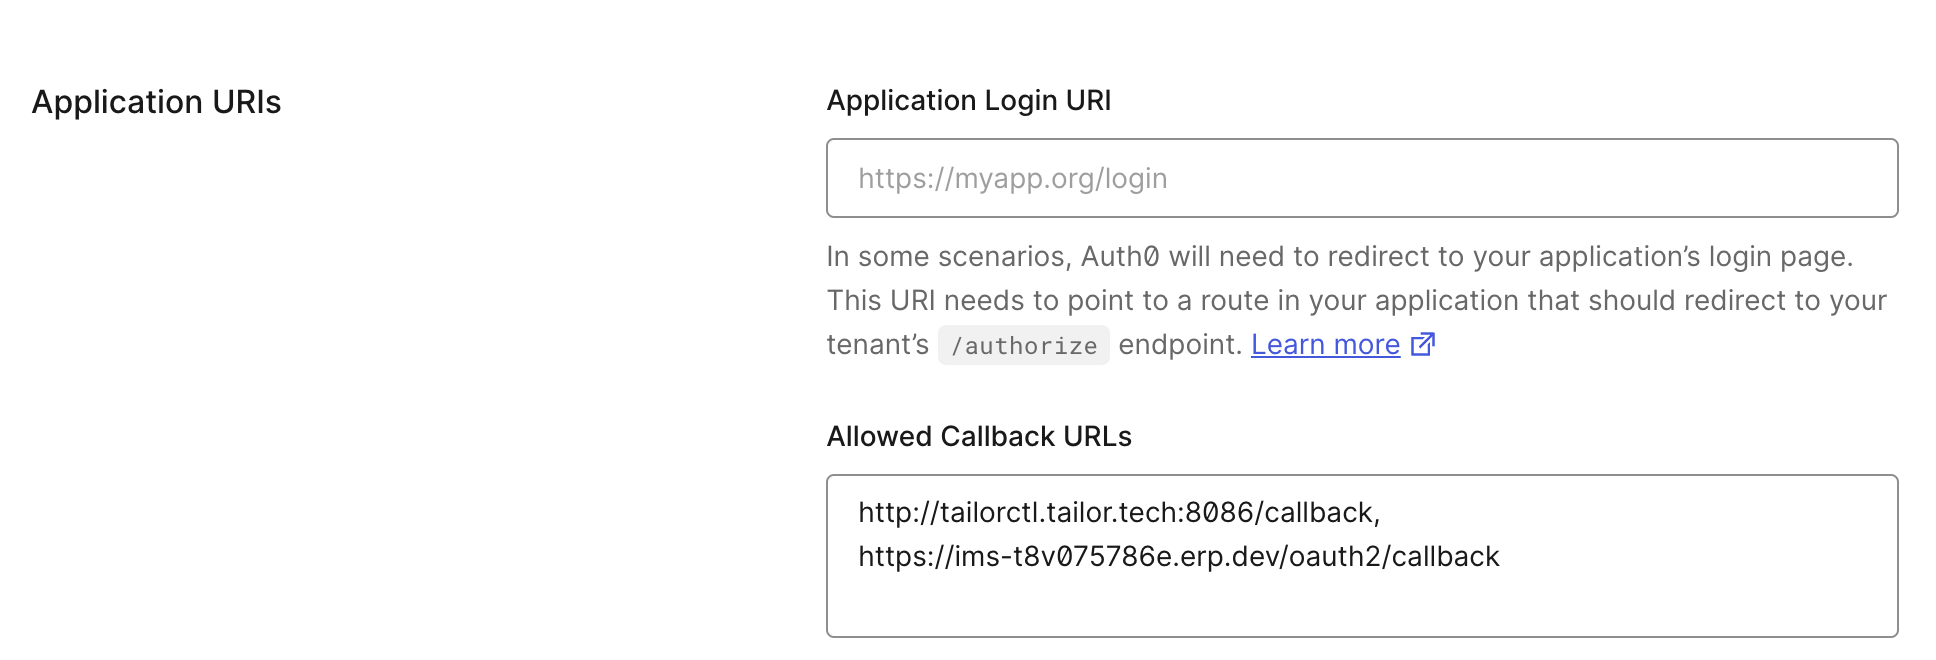
+---------------+---------------------------------------------+2. Add the callback URL in the application settings
Add https://{TAILOR_PF_APP_URL}/oauth2/callback to Allowed Callback URLs in the Application URIs section of the Application settings.
3. Next.js app configuration
You can clone the tailor-nextjs-starter Next.js app found here to explore the configuration of an OAuth 2.0 client using the library badgateway/oatuh2-client.
For managing OAuth 2.0 clients, it is recommended to use available libraries. As an example, @badgateway/oauth2-client is used here, but other libraries can also be utilized.
After cloning the repository, create a .env.local file in your project root directory and add the following environment variables:
OAUTH_SERVER_URL=http://{TAILOR_PF_APP_URL}/
OAUTH_CLIENT_ID={CLIENT_ID}
OAUTH_CLIENT_SECRET={CLIENT_SECRET}
NEXT_PUBLIC_BASE_URL=http://localhost:3000
Navigate to the application directory and run the following command to install the necessary dependencies.
npm iRun the following command to start the application.
npm run devWhen you visit http://localhost:3000/ in your browser you should now see the below screen:
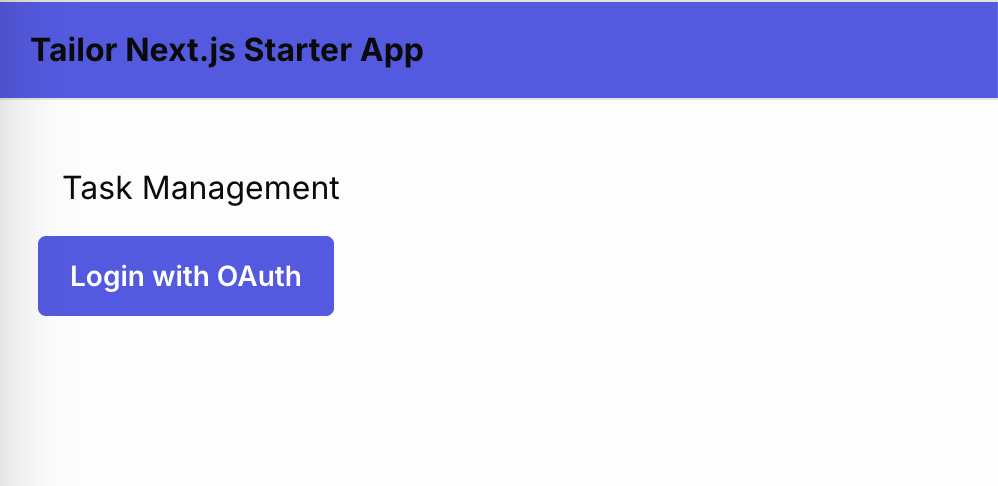
Clicking on the Login with OAuth button will redirect to Auth0 for authentication. Log in with your credentials.
To handle the redirectUri, it is recommended to use Next.js middleware rather than directly specifying a redirection destination. This approach ensures that the ID token from the IdP can be processed securely without exposure.
In this example, the Next.js middleware is configured to handle redirects at /__oauth/callback. You can specify the final redirect destination here.